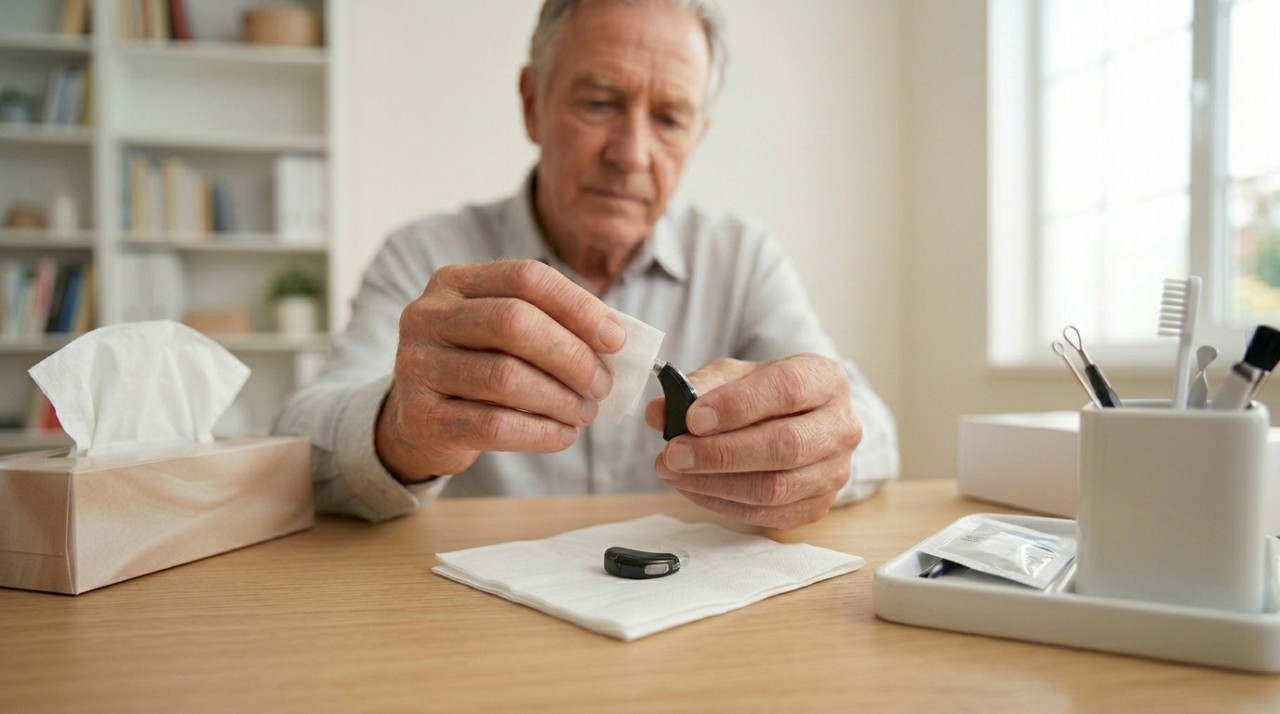
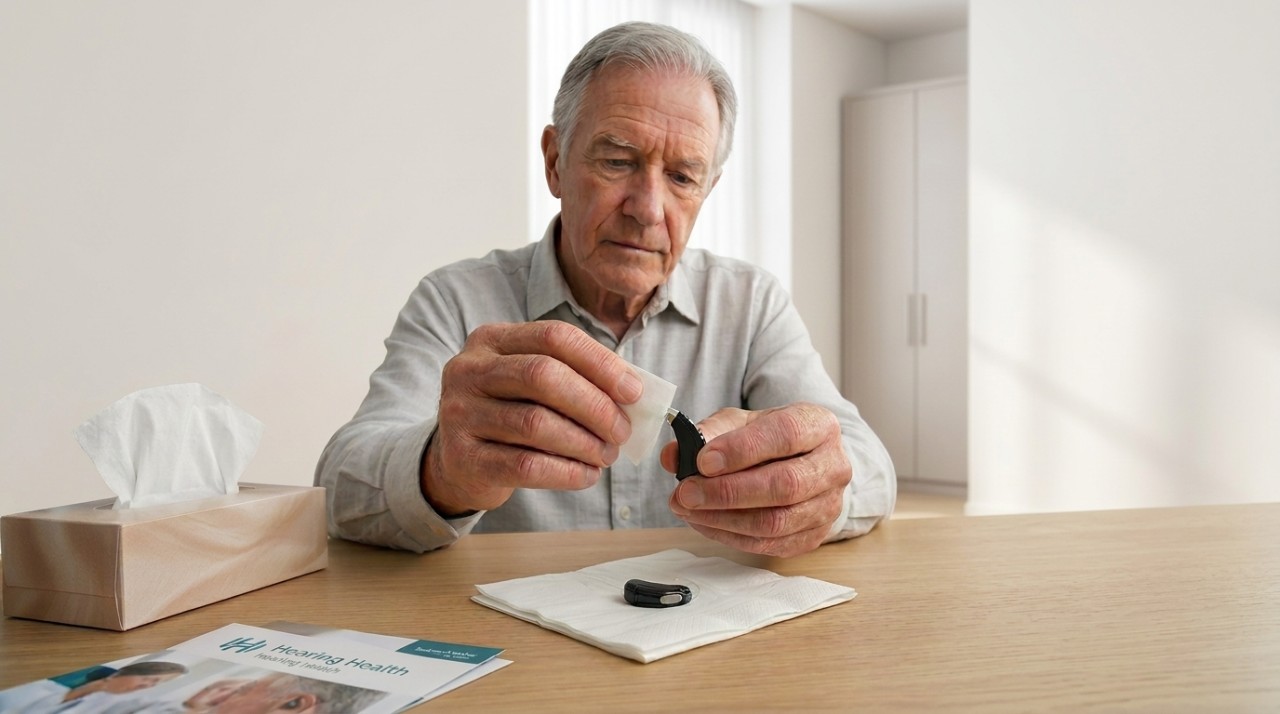
Knowing how to clean hearing aids properly is essential for maintaining clear sound quality, comfort and long-term performance. Hearing aids are sophisticated electronic devices that are worn for many hours each day, often in warm and humid conditions inside or around the ear. As a result, they are regularly exposed to earwax, moisture, sweat, skin oils and environmental debris. Without consistent care, this build-up can affect sound clarity, cause blockages and even lead to avoidable repairs. Regular cleaning not only protects the delicate internal components but also supports better hearing outcomes. Even a small amount of wax can obstruct microphone ports or receivers, resulting in muffled or distorted sound. Moisture, if left unmanaged, may damage circuitry or reduce battery efficiency, particularly in rechargeable models. A proper cleaning routine does not need to be complicated. With simple daily wiping, weekly detailed checks and occasional component replacement, most common issues can be prevented. Using the correct tools — such as a soft cloth, small brush and wax guards — ensures safe and effective maintenance. Understanding the correct techniques and what to avoid is equally important. With the right approach, you can extend the lifespan of your hearing aids and ensure they continue to perform reliably.

The relevance of cleaning hearing aids
Prevent earwax blockage
Moisture control
Hygiene
Ultimately, consistent cleaning ensures that hearing aids continue to provide clear, comfortable amplification. It protects your investment, extends device lifespan and supports better communication and quality of life.

How do you clean the hearing aids safely and effectively?
1. Switch off the device
2. Wipe the exterior daily
3. Brush away debris
4. Check wax guards and domes
5. Protect against moisture
If sound remains muffled after cleaning, consult your audiologist for professional servicing.


How often should a hearing aid be cleaned?
Hearing aids should be cleaned regularly to ensure optimal performance, comfort and longevity. In general, light daily cleaning is recommended, with more thorough maintenance carried out weekly. Because hearing aids sit in or behind the ear for many hours each day, they are exposed to earwax, moisture, sweat and debris, all of which can affect sound quality and functionality.
- On a daily basis, it is advisable to wipe the hearing aid gently with a soft, dry cloth or a specialised cleaning wipe. This helps remove surface wax and moisture. You should also check the microphone ports and receiver openings for visible debris. For rechargeable devices, ensure the charging contacts are clean and dry before placing them in the charger.
- Once a week, a more detailed clean is recommended. This may include using a small brush or wax pick provided by your audiologist to clear openings carefully.
- Wax guards or filters should be checked regularly and replaced as needed, typically every four to eight weeks, depending on wax production. Professional servicing is also important.
- Most manufacturers and audiologists recommend a check-up and deep clean every six months.
- Regular maintenance not only improves sound clarity but also reduces the risk of repairs and extends the lifespan of the device.
How to clean a hearing aid daily
Daily cleaning of your hearing aid is essential to maintain clear sound quality and prolong the life of the device. Because hearing aids are exposed to earwax, moisture and dust throughout the day, a simple routine can help prevent blockages and damage.
- First, switch off the hearing aid and, if applicable, remove the battery. For rechargeable models, ensure the device is powered down before cleaning. Gently wipe the exterior with a soft, dry, lint-free cloth to remove surface wax and moisture. Avoid using water, alcohol or household cleaning products, as these can damage sensitive components.
- Next, inspect the microphone ports and receiver openings. Use a small cleaning brush or wax pick (usually provided by your audiologist) to carefully remove any visible debris. Always brush away from the openings rather than pushing wax further inside.
- If your hearing aid has a dome or earmould, check it for wax build-up. Detachable domes can usually be wiped clean and replaced periodically as advised by your hearing care professional.
- Finally, store the hearing aid in a dry, well-ventilated place overnight. Leaving the battery compartment slightly open (for non-rechargeable devices) can help reduce moisture build-up.
A consistent daily routine helps maintain optimal performance and reduces the risk of repairs or sound distortion.
How do I clean hearing aids weekly?
In addition to daily wiping, hearing aids should receive a more thorough clean once a week to maintain optimal performance and prevent long-term damage. Weekly cleaning helps remove stubborn wax, debris and moisture that may not be cleared by routine surface care.
Start by switching off the device and removing the battery if it is not rechargeable. Use a soft, dry cloth to wipe the entire surface. Then, with a small hearing aid cleaning brush, gently clean around the microphone ports, receiver openings and any crevices. Always brush away from openings to avoid pushing wax inside the device.
Check the wax guard or filter. If it appears blocked or discoloured, replace it according to the manufacturer’s instructions. For behind-the-ear (BTE) models with tubing, detach the tubing if advised and use a specialised air blower to remove any trapped moisture. Ensure all parts are completely dry before reassembling.
If your hearing aids have earmoulds, these can often be detached and washed separately in lukewarm water with mild soap (only if approved by your audiologist). They must be thoroughly dried before reconnecting.
Finally, place the hearing aids in a drying box or dehumidifier overnight. Regular weekly maintenance improves sound clarity, reduces the risk of faults and helps extend the lifespan of your devices.
How do you clean hearing aids monthly?
- Monthly cleaning of hearing aids involves a deeper level of maintenance to ensure long-term performance and reliability. While daily and weekly care manage surface wax and moisture, a monthly routine focuses on inspecting key components and replacing small parts that naturally wear out.
- Begin by switching off the device. Carefully examine the hearing aid under good lighting. Check microphone ports, receiver openings and ventilation channels for any hardened wax or debris. Use a specialised cleaning brush and wax pick to gently remove build-up, always brushing away from openings.
- Replace wax guards or filters if they have not already been changed. Even if they appear clear, many manufacturers recommend routine replacement every four to eight weeks, depending on individual wax production. For behind-the-ear models, inspect the tubing for stiffness, discolouration or cracks. Tubing may need replacing every few months, as it can harden over time and affect sound transmission.
- If your device includes earmoulds, ensure they are thoroughly cleaned and fully dry. Rechargeable models should also have their charging contacts gently wiped with a dry cloth.
- In addition to home care, it is advisable to book a professional hearing aid service every six months. Regular monthly checks help maintain sound quality, reduce repairs and extend the overall lifespan of your devices.

Hearing aid maintenance and care: things to know
Daily cleaning is key
Moisture protection matters
Replace small components regularly
- Wax guards, filters and domes should be checked frequently and replaced as recommended by your audiologist. For behind-the-ear models, tubing may need periodic replacement if it becomes stiff or discoloured.
- Schedule professional servicing. Even with excellent home care, hearing aids benefit from professional cleaning and inspection every six months.
- Consistent maintenance not only preserves sound clarity but also reduces the risk of faults and costly repairs, ensuring your hearing aids continue to support your hearing effectively.
Schedule professional servicing
Consistent maintenance not only preserves sound clarity but also reduces the risk of faults and costly repairs, ensuring your hearing aids continue to support your hearing effectively.

How do you clean hearing aid components?
1. Hearing aid casing
2. Microphone ports and receiver openings
3. Wax guards and filters
4. Domes and earmoulds
5. Tubing (BTE models)
Regular, careful cleaning helps ensure reliable performance and extends the lifespan of your hearing aids.

How to clean hearing aid tubes
Hearing aid tubes, commonly found on behind-the-ear (BTE) models, need regular cleaning to prevent wax build-up and moisture from affecting sound quality. Blocked or stiff tubing can reduce amplification and cause distortion.
- Start by switching off the hearing aid and carefully detaching the tubing from the main device, if it is designed to be removed. Always follow your manufacturer’s or audiologist’s instructions before disconnecting any parts.
- If the tubing is attached to an earmould, separate the earmould from the hearing aid first. Wash the earmould and tubing (only if detachable and approved for washing) in lukewarm water with a small amount of mild, fragrance-free soap. Rinse thoroughly to remove any soap residue.
- Shake off excess water and use a specialised air blower (earmould puffer) to push air through the tube and remove trapped moisture. It is essential that the tubing is completely dry before reconnecting it to the hearing aid. Leaving it to air dry overnight on a clean towel is often recommended.
- Inspect the tubing for signs of stiffness, yellowing or cracks. Tubes naturally harden over time and typically need replacing every few months.
Regular cleaning and timely replacement help maintain clear sound transmission and extend the overall lifespan of your hearing aid.

How to clean hearing aid domes
Hearing aid domes are the small, soft silicone tips that sit inside the ear canal. Because they come into direct contact with earwax and moisture, they require regular cleaning to maintain sound quality and hygiene.
- Start by switching off the hearing aid and gently removing the dome from the receiver or thin tube. Most domes simply pull off, but always follow the manufacturer’s guidance to avoid damaging the device.
- Once removed, wipe the dome with a soft, dry cloth to clear away surface wax. If there is more noticeable build-up, you may clean the dome using lukewarm water and a small amount of mild, fragrance-free soap. Rinse thoroughly to remove any residue.
- After washing, allow the dome to dry completely before reattaching it. Moisture trapped inside the dome can affect sound transmission and potentially damage the receiver. It is best to leave the dome to air dry naturally on a clean towel.
- Inspect the dome for signs of wear, such as tears, stiffness or discolouration. Domes typically need replacing every one to three months, depending on usage and earwax production.
Regular cleaning and timely replacement help ensure clear sound, comfort and reliable performance from your hearing aids.

How to clean hearing aid moulds
Hearing aid moulds (also called earmoulds) sit inside the ear and can collect earwax, moisture and debris. Regular cleaning is important to maintain sound quality, hygiene and comfort.
- First, switch off your hearing aid and carefully detach the earmould from the main electronic unit. Never wash the hearing aid itself — only the mould if it is designed to be removed. If you are unsure, check the manufacturer’s instructions or ask your audiologist.
- Wash the earmould in lukewarm water with a small amount of mild, fragrance-free soap. Gently rub the mould to remove wax build-up. Avoid using very hot water, harsh detergents or alcohol-based cleaners, as these can damage the material.
- Rinse thoroughly to remove all soap residue. Shake off excess water and use a small air blower (earmould puffer) to push air through the tubing and remove trapped moisture. This step is important to prevent sound blockage.
- Allow the earmould to dry completely — ideally overnight on a clean towel — before reconnecting it to the hearing aid. Reattaching while damp can damage the electronics.
- Inspect the mould regularly for cracks, hardening or discolouration. If you notice changes in fit or sound quality, consult your hearing care professional for advice or replacement.

How to remove earwax from hearing aids
Earwax build-up is one of the most common causes of reduced sound quality in hearing aids. Regular removal helps prevent blockages, distortion and potential damage.
- Start by switching off your hearing aid. For battery-operated models, open the battery compartment. Place the device on a clean, well-lit surface so you can clearly see small openings.
- Use the small cleaning brush or wax pick provided by your audiologist. Gently brush around the microphone ports, receiver openings and vents to remove visible wax. Always brush away from the openings to avoid pushing wax further inside the device. Never use sharp objects such as pins or needles, as these can damage delicate components.
- If your hearing aid has a wax guard or filter, check whether it is blocked. Most modern devices include replaceable wax guards designed to protect the receiver. If clogged, replace the guard following the manufacturer’s instructions.
- For behind-the-ear models with domes or earmoulds, remove the dome or detach the earmould (if appropriate) and clean it separately. Domes can be wiped or washed if permitted, while earmoulds may be rinsed in lukewarm soapy water and fully dried before reattachment.
If sound remains muffled after cleaning, consult your audiologist for professional maintenance and inspection.
Can I use water to clean my hearing aids?
No, you should not use water to clean the main electronic part of your hearing aids. Hearing aids contain delicate internal components, including microphones and circuitry, which can be permanently damaged by moisture. Even small amounts of water can seep into openings and affect sound quality or cause the device to stop working altogether.
For daily cleaning, it is best to wipe the hearing aid with a soft, dry, lint-free cloth. You can also use a small cleaning brush provided by your audiologist to gently remove wax from microphone ports and receiver openings. Avoid rinsing, soaking or holding the device under running water.
However, there is one exception. If you wear behind-the-ear (BTE) hearing aids with detachable earmoulds, the earmoulds themselves (not the electronic unit) can usually be washed separately in lukewarm water with mild soap. They must be completely dry before reconnecting them to the hearing aid. Always check your manufacturer’s instructions first.
To manage moisture safely, consider using a hearing aid dehumidifier or drying box overnight. Proper cleaning and moisture control will help protect your device and extend its lifespan.
Can I use alcohol wipes or rub alcohol on the aid?
- In most cases, it is not recommended to use alcohol wipes or rubbing alcohol directly on your hearing aid unless the manufacturer specifically states that it is safe to do so. Hearing aids are delicate electronic devices with sensitive microphones, receivers and internal circuitry. Alcohol can damage protective coatings, dry out plastic components and potentially seep into small openings, leading to performance issues.
- While alcohol-based wipes may seem convenient for disinfecting, repeated use can cause parts such as domes, tubing and casing materials to become brittle or discoloured over time. Strong cleaning agents may also weaken adhesive seals that protect against moisture. For routine cleaning, it is best to use a soft, dry, lint-free cloth to wipe the outer surface. A small brush designed for hearing aids can be used to remove wax from openings. If disinfection is necessary, especially for health reasons, ask your audiologist whether manufacturer-approved cleaning wipes are suitable for your specific model.
- If you are unsure, always consult your hearing care professional or refer to the user guide. Using the wrong cleaning products can shorten the lifespan of your device and may invalidate the warranty.
How often should I change wax guards?
- Wax guards (also called wax filters) should typically be changed every four to eight weeks, depending on how much earwax you naturally produce and how often you wear your hearing aids. These small components sit at the end of the receiver and are designed to protect the internal parts from wax and debris.
- However, there is no single rule that applies to everyone. Some people may need to replace their wax guards more frequently — even every two to four weeks — if they produce a higher amount of earwax. Others may find they last longer.
- A clear sign that it is time to change the wax guard is a noticeable reduction in sound quality. If your hearing aid sounds muffled, weak or distorted, and the battery is functioning properly, a blocked wax guard is often the cause. Replacing it is usually quick and can restore normal performance immediately.
- It is a good idea to check the wax guard weekly during routine cleaning. Even if it does not look completely blocked, replacing it regularly helps maintain consistent sound clarity.
- If you are unsure how often to change them, your audiologist can provide guidance based on your individual needs and device model.
Should I use a hearing aid drying box?
- Yes, using a hearing aid drying box is highly recommended, especially if you wear your devices daily. Hearing aids are small electronic instruments that are sensitive to moisture from sweat, humidity and earwax. Even in the UK’s often damp climate, moisture can accumulate inside the device and affect performance over time.
- A drying box (or dehumidifier) safely removes residual moisture overnight. Simply place your hearing aids inside before you go to bed. The box gently draws out water vapour, helping to protect internal components such as microphones, receivers and batteries. This can reduce crackling, distortion and intermittent faults that are often caused by trapped moisture.
- Drying boxes are especially useful if you live in a humid environment, exercise regularly, or notice that your hearing aids become damp or perform inconsistently. They are also beneficial for rechargeable models, as moisture around charging contacts may affect reliable charging.
- While a drying box does not replace regular cleaning, it enhances device longevity and reduces the risk of costly repairs. Many hearing care professionals in the UK recommend using one as part of a daily maintenance routine. If you’re unsure which model to choose or how to use it, your audiologist can provide personalised advice.

How do I clean rechargeable hearing aids?
Cleaning rechargeable hearing aids requires the same care as battery-operated models, with extra attention to the charging contacts. Regular maintenance helps ensure reliable performance and consistent charging.
- Start by switching off the device. Wipe the outer casing daily with a soft, dry, lint-free cloth to remove earwax, oils and moisture. Avoid using water, alcohol or household cleaning products, as these can damage internal electronics.
- Use a small hearing aid cleaning brush to gently remove wax from microphone ports, receiver openings and vents. Always brush away from openings to prevent pushing debris inside.
- Pay particular attention to the charging contacts. These small metal points must remain clean and dry for proper charging. Gently wipe them with a dry cloth. If necessary, use a clean, dry cotton bud to remove visible debris — but never apply liquid cleaners.
- If your device has domes, check them regularly for wax build-up and replace them as recommended. Wax guards should also be inspected and changed when blocked or every four to eight weeks.
- Finally, store your hearing aids in their charging case in a dry place. Many audiologists recommend using a drying box for added moisture protection. Consistent care helps maintain battery efficiency, sound clarity and overall device lifespan.
What should I avoid when cleaning hearing aids?
Cleaning your hearing aids correctly is essential — but knowing what not to do is just as important. Using the wrong methods or products can damage delicate components and shorten the lifespan of your devices.
- Avoid using water on the electronic part. Hearing aids are not waterproof (unless specifically stated by the manufacturer). Never rinse, soak or hold them under running water.
- Do not use alcohol, solvents or household cleaners. Products such as rubbing alcohol, disinfectant sprays or multi-purpose cleaners can damage protective coatings, dry out plastic parts and affect internal circuitry.
- Avoid sharp objects. Pins, needles, toothpicks or metal tools can easily damage microphone ports, receivers and wax guards. Always use the cleaning tools provided by your audiologist.
- Do not use cotton buds inside openings. Cotton fibres can get stuck and push wax deeper into the device.
- Avoid heat sources. Never use a hairdryer, radiator or microwave to dry hearing aids. Excessive heat can warp components and harm the battery.
- Do not reassemble damp parts. If you wash detachable earmoulds, ensure they are completely dry before reconnecting them.
Following safe cleaning practices helps maintain sound quality, prevent faults and extend the life of your hearing aids.
How often should I have professional servicing?
Most hearing care professionals recommend having your hearing aids professionally serviced every six months. Even with careful daily and weekly cleaning at home, a routine check-up helps ensure your devices continue to perform at their best.
- During a professional service, your audiologist will carry out a deep clean using specialist tools that remove compacted wax and debris from areas you cannot safely access yourself. They will also check the microphones, receivers, tubing, charging contacts and battery performance. For behind-the-ear models, tubing may be replaced if it has hardened or discoloured.
- Regular servicing also allows your audiologist to assess whether your hearing prescription needs adjusting. Hearing can change over time, and small programming updates may significantly improve clarity and comfort.
- You may need more frequent appointments if you produce a high amount of earwax, live in a humid environment, or notice issues such as muffled sound, distortion or intermittent performance.
- In addition to routine six-month checks, you should book an appointment promptly if your hearing aids stop working properly. Preventative servicing helps extend the lifespan of your devices and reduces the likelihood of costly repairs.


Hearing aids cleaning kit: what tools should include
A good hearing aid cleaning kit equips you with the essential tools to keep your devices working clearly and reliably. Because hearing aids are small and sensitive, using the right items makes routine maintenance safe and effective.
1. Cleaning brush
A soft-bristled brush helps remove earwax and debris from microphone ports, vents and small crevices without damaging delicate parts.
2. Wax pick / loop
This tool allows gentle removal of stubborn wax from openings. Always use it carefully to avoid pushing debris further inside.
3. Wax guard tools and spare filters
Many kits include replacement wax guards or filters plus the small tool needed to change them. These protect the receiver and should be replaced regularly.
4. Domes and tips
Extra domes (for RIC or BTE models) allow you to swap worn or waxy tips easily for improved comfort and sound quality.
5. Air blower / bulb
An air blower helps remove trapped moisture or loosen wax in earmould tubing or slim tubes without using water.
6. Cleaning cloth
A soft, lint-free cloth is ideal for wiping the hearing aid’s exterior daily to clear oils and residue.
7. Tubing hooks or picks
These help clean and inspect tubing for blockages in behind-the-ear models.
8. Drying container or desiccant
Some kits include desiccant or a small drying container to reduce moisture buildup overnight.
Maintenance kits
A well-stocked cleaning kit supports daily and weekly maintenance, helping to preserve sound quality and extend the life of your hearing aids.
Hearing aid wipes: how to use them
Hearing aid wipes are a convenient way to keep your devices clean and hygienic, especially for daily surface cleaning. However, it is important to use wipes that are specifically designed for hearing aids, as general disinfectant wipes may contain chemicals that can damage delicate components.
- First, switch off your hearing aid. If it uses disposable batteries, open the battery compartment before cleaning. For rechargeable models, ensure the device is powered down and disconnected from the charger.
- Take a single hearing aid wipe and gently clean the outer casing of the device. Focus on areas that come into contact with your skin, such as the body of the hearing aid and the dome or earmould (if not detachable). Avoid pressing too firmly.
- Do not insert the wipe into microphone ports, receiver openings or vents, as moisture could enter and damage internal electronics. Hearing aid wipes are designed for external cleaning only.
- After wiping, allow the device to air dry completely before placing it back in your ear or into the charging case.
- Used correctly, hearing aid wipes help remove surface bacteria, earwax residue and oils, supporting both hygiene and device longevity.
NHS hearing aid cleaning kit: things to know
If you receive your hearing aids through the NHS in the UK, your audiology department may provide—or recommend—the appropriate cleaning kit and guidance on how to use it. NHS hearing aid cleaning kits are designed to include the essential tools you need to maintain your device safely and effectively between clinic appointments.
A typical NHS-recommended kit will often include:
- Cleaning brush: A small, soft brush for removing earwax and debris from microphone ports, vents and openings.
- Wax pick or loop: Used gently to dislodge wax from hard-to-reach areas without damaging sensitive parts.
- Wax guards/filters: Replacement wax guards help protect the receiver from build-up and should be changed regularly as advised.
- Domes or replacement tips: For models that use domes, spare tips help ensure a clean, comfortable fit.
- Small cloth: A soft, dry, lint-free cloth for wiping the outer casing.
The NHS may also advise on additional items such as an air blower for tubing or a drying container to reduce moisture build-up.
It’s important to follow NHS guidance on cleaning frequency and technique, as using incorrect methods or household products can harm your hearing aids and potentially invalidate warranties or service agreements. If you are unsure about any tool or step, your audiologist can demonstrate proper use and answer questions tailored to your specific device. Regular maintenance supports sound quality, comfort and the long-term reliability of your NHS-provided hearing aids.
Hearing aid cleaning brushes: what to know
Hearing aid cleaning brushes are simple but essential tools for maintaining your devices. Because hearing aids are small and have tiny openings, regular brushing helps remove earwax and debris that can interfere with sound quality and long-term performance.
Purpose of a cleaning brush
- A cleaning brush is designed to gently remove wax, dust and skin oils from the microphone ports, vents and small crevices of your hearing aids. Regular brushing prevents blockages that can cause muffled or distorted sound and reduces the risk of internal damage.
How to use it
- Always brush away from openings to avoid pushing wax further inside the device.
- Use short, gentle strokes along the surface and around ports.
- If your brush has a small pick or loop on the opposite end, use that carefully to dislodge stubborn debris.
Types of brushes
- Some cleaning brushes come as part of multi-tool kits, while others are stand-alone. They vary slightly by model, so choose one that matches your hearing aid type (e.g., behind-the-ear, in-the-ear, receiver-in-canal). Soft bristles are ideal to avoid scratching or damaging delicate components.
Care and replacement
- Cleaning brushes should be replaced periodically when bristles become worn or discoloured. Keeping the brush clean and dry also prevents spreading debris back onto your hearing aids.
- Used correctly and regularly, a hearing aid cleaning brush helps maintain clarity, comfort and device longevity.

Hearing aid cleaners per type
Different types of hearing aids require slightly different cleaning approaches. Using the correct tools for your specific model helps maintain sound quality and prolong device lifespan.
Behind-the-Ear (BTE) hearing aids
BTE hearing aids sit behind the ear and connect to an earmould or dome via tubing. Cleaning should include wiping the outer casing daily with a dry, lint-free cloth and brushing microphone openings carefully. The earmould (if detachable) can usually be washed separately in lukewarm soapy water and fully dried before reattaching. Tubing may require an air blower to remove trapped moisture and should be replaced periodically if it becomes stiff or discoloured.
Receiver-in-Canal (RIC) hearing aids
RIC models are similar to BTE devices but have a thin wire and receiver placed in the ear canal. Daily wiping and gentle brushing of the microphone ports are essential. Wax guards should be checked regularly and replaced when blocked. Domes should be cleaned or replaced as recommended, typically every one to three months.
In-the-Ear (ITE) hearing aids
ITE hearing aids sit entirely within the outer ear. Because they are more exposed to earwax, regular brushing of receiver openings and vents is important. Use a wax pick to remove debris carefully. Avoid moisture exposure and consider a drying box for protection.
In-the-Canal (ITC) and CIC hearing aids
These smaller devices sit deeper in the ear canal and are more prone to wax build-up. Daily cleaning with a small brush and frequent wax guard replacement are essential. Due to their size and exposure to moisture, consistent drying and professional servicing are strongly recommended.
Professional hearing aid cleaning: what it include
1. Full inspection of the device
2. Deep cleaning with specialised tools
3. Wax guard or filter replacement
4. Tubing and component checks
5. Performance testing
6. Fit and comfort review
Professional servicing every six months — or more often if needed — helps catch issues early, maintains optimum performance and can extend the life of your hearing aids. If you experience persistent muffled sound, feedback or discomfort, book a professional clean sooner.


